Whether you’re looking to upgrade your bathroom aesthetic or simply addressing a leaky fixture, mastering the art of faucet replacement is a valuable skill. In this guide, we’ll walk you through the step-by-step process of how to change a bathtub faucet, equipping you with the knowledge and confidence needed to seamlessly do it.
Get ready to turn your bathroom into a personalized oasis with this straightforward tutorial.
Tools and Materials Needed
Essential Tools
Embarking on the task of changing a bathtub faucet requires a set of essential tools to ensure a smooth and successful replacement. You’ll need an adjustable wrench, pipe wrench, and pliers for gripping and turning various components.
A screwdriver, both flathead and Phillips, is crucial for removing and securing screws, while plumber’s tape will help seal connections and prevent leaks. Having towels or rags on hand is also wise to manage any water that may escape during the process.
It’s important to remember that the right tools can make all the difference in achieving a professional finish.
A hex key and a pass-through socket wrench are particularly useful for reaching nuts that are recessed or difficult to access.
Additionally, a tape measure will assist in ensuring that your new spout and stems are the correct size, avoiding any unnecessary complications during installation. With these tools at your disposal, you’re well-equipped to tackle the faucet replacement with confidence.
Replacement Faucet
When selecting a replacement faucet, consider the design and functionality that best suits your bathroom’s aesthetic and your personal preferences. Ensure that the new faucet is compatible with your bathtub’s current plumbing configuration to avoid any mismatch issues.
It’s advisable to take your old faucet and handles to the store or compare them with online specifications to guarantee a perfect fit. Whether you opt for a classic or contemporary style, the right replacement faucet will not only enhance the look of your bathroom but also ensure a reliable and leak-free experience.
Moreover, if you’re aiming for a coordinated look, you might want to select a matching shower head or sink faucet.
This attention to detail can elevate the overall appearance of your bathroom. Keep in mind that for specialty parts, such as uniquely-sized spouts or designer handles, you may need to source them from an online plumbing supplier or directly from the manufacturer.
With the correct replacement faucet in hand, you’re ready to move forward with the installation process, one step closer to a refreshed and updated bathroom.
Additional Supplies
Alongside the primary tools and the replacement faucet, a few additional supplies will be instrumental in ensuring a seamless installation.
A caulk gun will come in handy for applying a watertight seal around the faucet base, preventing future water damage. It’s also a good idea to have a cloth or towel ready to protect the bathtub surface from scratches and to clean up any residual water or debris.
Plumber’s tape, an essential item, will be used to wrap the threads of the new faucet components, providing an extra layer of leak prevention. With these supplies, you’re fully prepared to embark on the faucet replacement, equipped like a seasoned DIY enthusiast.
Before diving into the replacement process, it’s crucial to lay down a towel or cloth in the bathtub to safeguard the finish from any tools or parts that might accidentally drop. This simple precaution can prevent unsightly damage and save you from future headaches.
Additionally, keep a second towel within reach to wrap around open valve stems, which will help contain any unexpected water flow when you turn off the water supply. By meticulously preparing with these additional supplies, you’re setting the stage for a smooth and efficient faucet replacement.
Preparing for the Faucet Replacement
Shutting Off the Water Supply
Initiating the faucet replacement begins with a critical step: shutting off the water supply. To prevent any inadvertent water flow or potential flooding, locate the main water supply valve for your home, which is often situated in the basement or outside.
Turn the valve perpendicular to the pipes, effectively halting the water’s journey to your bathtub.
This action ensures a dry work environment, allowing you to proceed with confidence. Remember, while the water is off, other fixtures in your home will also be temporarily out of service, so plan accordingly.
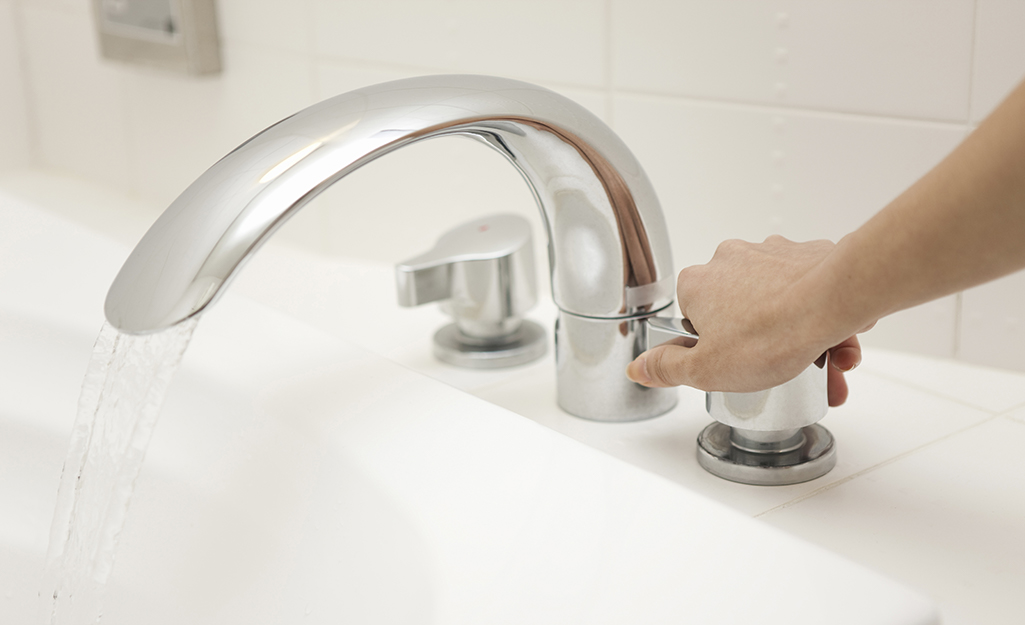
Once the water supply is securely shut off, open the bathtub faucet to release any remaining water from the pipes.
This will clear the way for a mess-free removal of the old faucet and handles. A steady stream may flow initially, but it will soon dwindle to a trickle and stop, signaling that it’s safe to move on to the next phase of the project.
With the water fully drained, you’re now ready to protect the bathtub surface and begin the actual removal of the old faucet components.
Draining Remaining Water
After ensuring the water supply is cut off, the next step is to drain the remaining water from the pipes to avoid any spills during the faucet removal.
Open the faucet to let any residual water flow out; this may take a few moments as the water in the pipes empties completely.
Once the water ceases to drip from the spout, you can confidently proceed, knowing that the risk of water-related mishaps is minimized. This precautionary step is essential for a tidy and controlled faucet replacement process.
Protecting the Bathtub Surface
Protecting the bathtub surface is paramount to maintaining the integrity and appearance of your bathroom during the faucet replacement process. Before you begin the removal of the old faucet, lay a soft cloth or towel at the bottom of the tub.
This simple yet effective measure prevents scratches and scuffs on the tub’s surface from tools or removed hardware.
Additionally, placing a towel over the drain ensures that small parts, such as screws or washers, do not accidentally slip down the drain, potentially causing a clog or the need for retrieval.
With these precautions in place, you can focus on the task at hand without worrying about unintended damage to your bathtub.
Removing the Old Bathtub Faucet
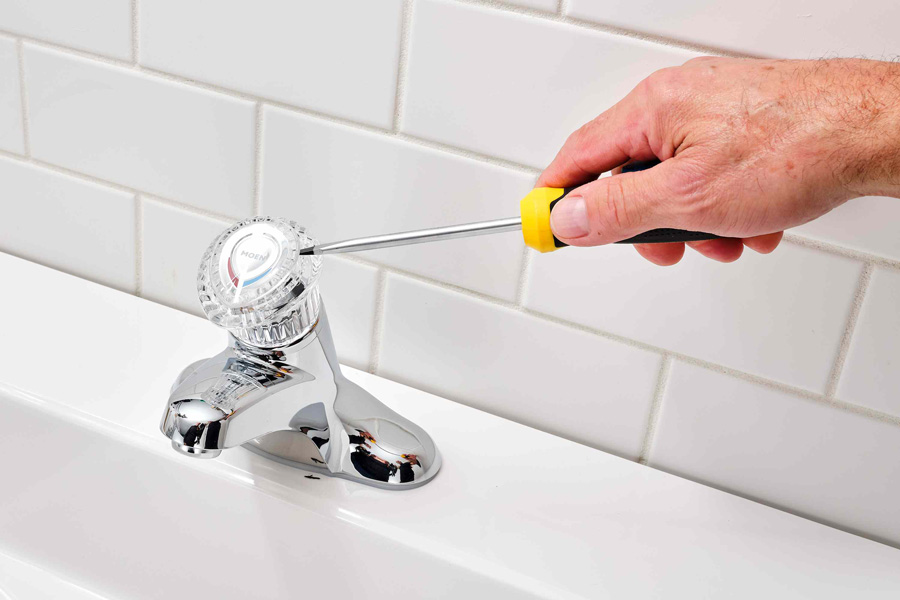
Detaching Faucet Handles
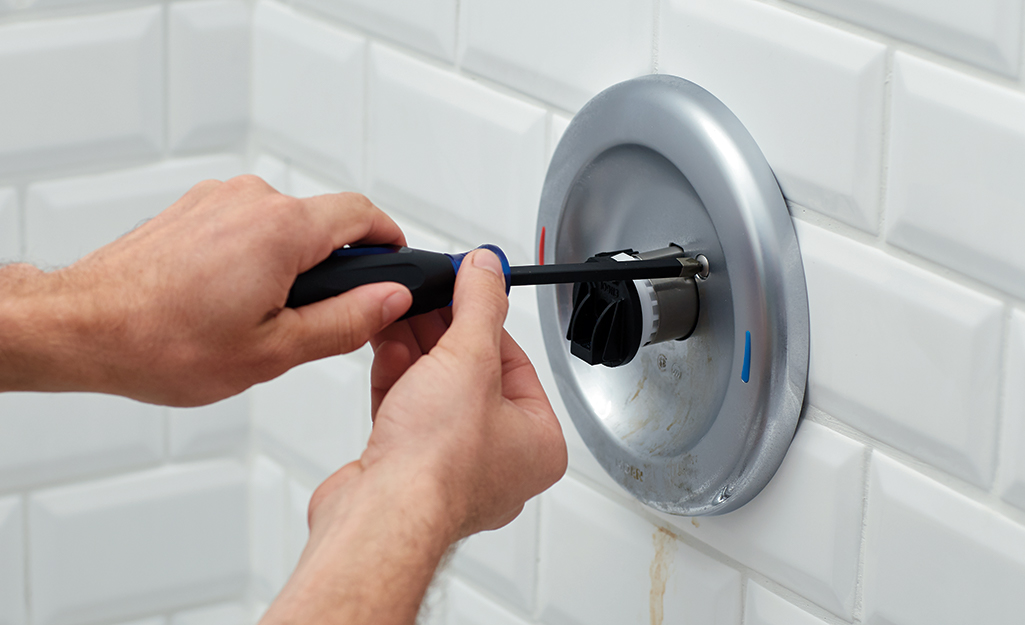
Detaching the faucet handles is the initial step in removing the old bathtub faucet. Begin by carefully prying off the decorative caps on the handles, if present, to expose the underlying screws.
Using a screwdriver, turn the screws counterclockwise to release the handles from the mounting stems.
In instances where the handles resist removal, employ a specialized handle puller to avoid damaging the fixtures. Attach the puller’s post to the screw head, ensuring the arms are positioned behind the handle, and turn the post until the handle pops free.
This method ensures a clean removal without exerting excessive force that could harm the bathtub’s finish or the plumbing.
Once the handles are detached, you can proceed to remove any trim or escutcheons that may be concealing the valve stem. This exposes the components necessary for the next phase of the process, which involves unscrewing the valve stem.
It’s advisable to keep the removed parts organized and in a safe place, as they can serve as a reference when selecting compatible replacements for your new bathtub faucet.
With the handles and accompanying trim set aside, the path is clear for accessing and extracting the valve stem, bringing you one step closer to installing your new faucet.
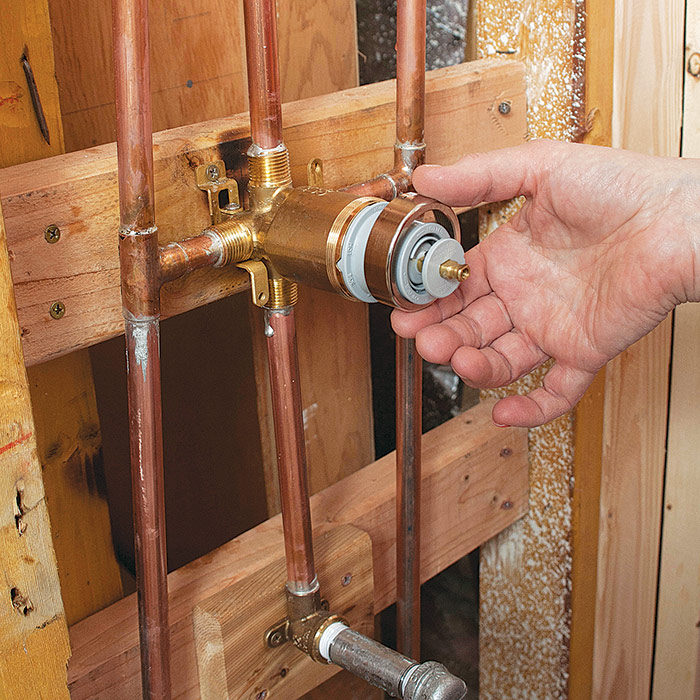
Unscrewing the Valve Stem
Unscrewing the valve stem is a critical step in changing a bathtub faucet, as it controls the flow and temperature of the water.
To remove the stem, you’ll need a bath socket wrench, which is designed to fit the unique shape of the stem assembly. Carefully insert the wrench over the stem and turn it counterclockwise to loosen it.
As you unscrew the stem, be mindful not to apply excessive force, which could damage the plumbing.
Once the stem is free, inspect it alongside the other removed parts to ensure you have a complete understanding of the assembly before purchasing a replacement. This attention to detail will facilitate a smoother installation of the new faucet components.
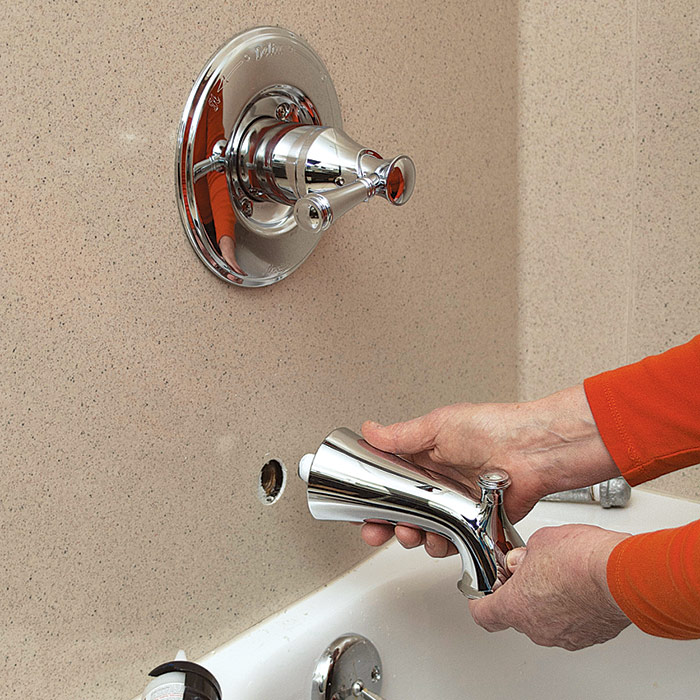
Extracting the Spout
Extracting the spout is the next crucial step in the bathtub faucet replacement process. If your spout is secured with a mounting screw, locate it underneath the spout and use an Allen wrench to turn it counterclockwise, loosening the screw.
After the screw is removed, gently pull the spout away from the wall, taking care not to damage the pipe it’s attached to. For spouts without screws, they may simply twist off by hand or with the aid of a strap wrench to prevent marring the finish.
Remember to also remove the escutcheon plate, if present, by unscrewing it with a flathead screwdriver. This will fully expose the area for the new spout installation, ensuring a seamless transition to the updated hardware.
With the old spout removed, you’re now ready to embark on the most transformative part of the project—installing the new bathtub faucet. This is where your preparation pays off, as you’ll have a clear workspace and all necessary components at hand to complete the upgrade.
Ensuring that you have the correct type of spout—whether it’s a slip-on or screw-on model—is essential for a successful installation.
By following these meticulous steps, you’re not only enhancing the aesthetic appeal of your bathroom but also ensuring the functionality and longevity of your new faucet.
Installing the New Bathtub Faucet

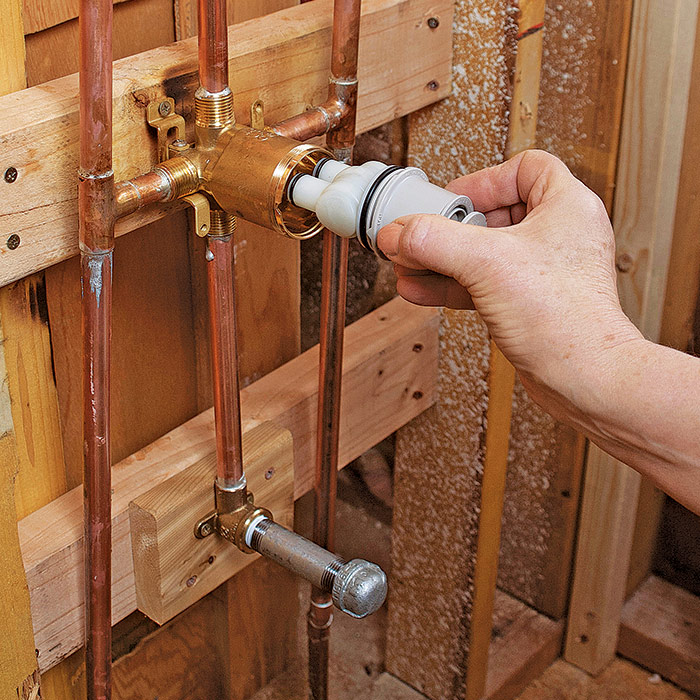
Securing the Valve Stem
Securing the valve stem is a pivotal moment in the installation of your new bathtub faucet. Begin by carefully threading the new stem into the opening where the old one was positioned, turning it clockwise to engage the threads.
It’s important to strike a balance between a snug fit and over-tightening; use a socket wrench to tighten the stem, but do so with a gentle touch to avoid any damage to the delicate plumbing.
Repeat this process for each handle if your bathtub design includes multiple controls. A properly secured valve stem is the foundation for a leak-free faucet, setting the stage for the final steps of your bathroom update.
Once the new stems are in place, it’s time to focus on the aesthetic and operational centerpiece—the handles. These are not just functional elements but also contribute significantly to the overall look of your bathroom.
Ensure that the handles are aligned correctly before securing them, as this will affect both the operation of the valves and the visual symmetry of your setup. With the stems secured and the handles attached, your bathtub is one step closer to showcasing its new, upgraded look.
Attaching the New Spout
Attaching the new spout is a straightforward yet vital part of the faucet replacement process. If you’ve chosen a slip-on model, align it with the stub-out pipe and slide it into place before tightening the set screw to secure it.
For a screw-on spout, align the threads with the stub-out pipe and rotate the spout clockwise until it’s firmly attached. In both cases, ensure the spout is straight and level for a professional finish. If your spout includes an escutcheon plate, now is the time to position it before the final tightening to conceal any gaps and provide a clean look.
After the spout is affixed, double-check for stability and alignment, as this will prevent future issues and ensure a seamless flow of water. Remember, a correctly installed spout not only improves the functionality of your bathtub but also elevates the overall design of your bathroom. With the new spout in place, your bathtub faucet is nearly complete, ready to deliver both performance and style for years to come.
Installing Faucet Handles
Securing the valve stem is a pivotal moment in the installation of your new bathtub faucet. Begin by carefully threading the new stem into the opening where the old one was positioned, turning it clockwise to engage the threads.
It’s important to strike a balance between a snug fit and over-tightening; use a socket wrench to tighten the stem, but do so with a gentle touch to avoid any damage to the delicate plumbing.
Repeat this process for each handle if your bathtub design includes multiple controls. A properly secured valve stem is the foundation for a leak-free faucet, setting the stage for the final steps of your bathroom update.
Once the new stems are in place, it’s time to focus on the aesthetic and operational centerpiece—the handles. These are not just functional elements but also contribute significantly to the overall look of your bathroom.
Ensure that the handles are aligned correctly before securing them, as this will affect both the operation of the valves and the visual symmetry of your setup. With the stems secured and the handles attached, your bathtub is one step closer to showcasing its new, upgraded look.
Finishing Touches
Checking for Leaks
Checking for leaks is an essential step in ensuring the integrity of your newly installed bathtub faucet.
After the handles are securely in place, turn the water supply back on and observe the faucet for any signs of dripping or moisture. Pay close attention to the connections between the spout, valve stems, and handles.
A dry, leak-free faucet indicates a successful installation, but if you do notice any water escaping, it may be necessary to revisit the connections and tighten them further. This careful inspection safeguards against water damage and guarantees the longevity of your bathroom fixtures.
If all appears well and no leaks are present, it’s time to apply a bead of caulk around the base of the spout and the escutcheon plate, if applicable.
This not only provides an additional layer of protection against water seepage but also gives a polished finish to the installation.
Allow the caulk to dry as per the manufacturer’s instructions before conducting a final test by running the water and checking once more for any leaks.
A thorough, methodical approach at this stage will ensure that your new bathtub faucet operates flawlessly and remains a reliable part of your daily routine.
Applying Caulk if Necessary
With the handles firmly in place and the water supply reestablished, the next step is to apply caulk where necessary to prevent future leaks. A steady hand and a caulk gun are all you need to seal the base of the spout and any cover plates.
This extra precaution helps to keep water from sneaking into the walls, which could cause damage or mold growth over time. Smooth out the caulk for a clean, professional appearance, ensuring that it forms a watertight barrier.
Once the caulk is applied, patience is key—allow it to dry completely according to the product’s specified drying time before moving on to the final testing phase.
After the caulk has set, it’s crucial to perform a thorough inspection of your work. Turn on the water and let it flow through the faucet, watching for any signs of leakage around the newly installed components.
This is the moment to confirm that your efforts have paid off and that your new bathtub faucet is not only visually appealing but also fully functional.
By taking the time to apply caulk and check for leaks, you’re ensuring that your bathroom remains a sanctuary of relaxation, free from the worries of unwanted water damage.
Cleaning Up the Work Area
Once you’ve confirmed that your new bathtub faucet is leak-free and the caulk has been expertly applied, it’s time to focus on cleaning up the work area. Begin by gathering all tools and materials, ensuring that nothing is left behind.
Remove any debris, such as old faucet parts or packaging materials, and dispose of them properly. Wipe down the surfaces to remove any fingerprints or smudges that may have occurred during the installation process.
A clean and tidy bathroom not only reflects the quality of your work but also allows you to admire the updated look of your new faucet without any distractions.
Finally, revisit the bathtub itself to ensure that it’s free from any installation residue. The towels you placed earlier have served their purpose in protecting the tub’s surface; now, remove them and check for any signs of scuffing or scratching that might need attention.
A quick polish of the new faucet and a rinse of the tub will bring out the shine in your bathroom’s latest addition. With the area spotless and your tools packed away, you can take pride in a job well done, knowing that your expertise has once again led to a successful home improvement project.
Maintenance Tips for Your New Faucet

Maintaining your new bathtub faucet is essential to prolong its life and ensure it continues to operate efficiently. Regularly clean the faucet with a gentle, non-abrasive cleaner to prevent mineral buildup from hard water, which can impede function and mar the finish.
It’s also wise to inspect the faucet periodically for any signs of wear or leaks. If you notice a drip or a decrease in water pressure, address it promptly to avoid further complications.
Remember, a well-maintained faucet not only looks better but also saves water and reduces the likelihood of costly repairs down the line.
Another key maintenance tip is to occasionally check the caulking around the faucet and handles. Over time, caulk can shrink or crack, which might allow water to seep behind walls or into the tub’s surround. A quick reapplication of caulk can prevent water damage and mold growth.
Additionally, if your faucet has an aerator, cleaning it every few months will ensure a consistent water flow and prevent clogging. By following these simple maintenance steps, you can enjoy the beauty and functionality of your new bathtub faucet for years to come.
Troubleshooting Common Issues
Dealing with Leaks
Dealing with leaks in your bathtub faucet can be a nuisance, but with the right approach, it’s a manageable task. If you encounter a leak, it’s often due to worn-out washers, seals, or gaskets within the valve assembly.
These components are crucial for creating a watertight seal and preventing water from dripping through. To address this, disassemble the faucet to access the valve stem and replace any damaged parts.
Corrosion can also contribute to leaks, particularly in areas with hard water. Inspect the spout and its connections for signs of corrosion and make replacements as necessary. Remember, a timely response to leaks not only preserves the integrity of your faucet but also conserves water and prevents further damage to your bathroom.
Should you find the task of fixing leaks daunting or if the problem persists after your initial efforts, don’t hesitate to seek professional help. A seasoned plumber can swiftly diagnose the issue, whether it’s a corroded tub spout part or an improperly installed washer, and perform the necessary repairs.
This ensures that your bathtub faucet operates smoothly, allowing you to enjoy a leak-free bathroom experience. Keep in mind that regular maintenance and prompt attention to any signs of malfunction are key to the longevity of your faucet’s performance.
Addressing Stiff Handles
Addressing stiff handles is another aspect of faucet maintenance that should not be overlooked. If you find that the handles of your new bathtub faucet are difficult to turn, it could be an indication of mineral deposits from hard water, or the stems may not have been lubricated properly during installation.
To remedy this, remove the handles and apply a non-toxic, plumbing-safe lubricant to the stem before reattaching them. It’s important to ensure that the handles are not overtightened during reinstallation, as this can cause additional resistance and wear on the components.
By keeping the handles and stems well-lubricated, you’ll ensure smooth operation and extend the life of your faucet.
When purchasing replacement stems and handles, always opt for those that are compatible with your specific faucet model. Home improvement stores often offer kits that include both stems and handles, simplifying the selection process.
If you’re unsure about the type of handles or stems needed for your system, consulting with a plumbing expert or the store’s customer service can provide clarity and prevent potential issues.
Regular checks and minor adjustments can go a long way in preventing stiff handles, ensuring a comfortable and efficient use of your bathtub faucet.
Conclusion
In conclusion, mastering how to change a bathtub faucet is an invaluable skill that can save you time and money. By following the steps outlined, from shutting off the water supply to applying the finishing touches, you can confidently tackle this home improvement project.
Remember, the key to a successful faucet replacement lies in careful preparation, the right tools and materials, and a methodical approach to installation and maintenance. With the insights and troubleshooting tips provided, you’re well-equipped to handle common issues and ensure the longevity of your new bathtub faucet.
Whether you’re a DIY enthusiast or a first-timer, the satisfaction of completing this task is both rewarding and beneficial to the overall upkeep of your bathroom.
Should any challenges arise during your faucet replacement journey, remember that resources like this guide are here to assist you.
With the collective wisdom of seasoned professionals like Patrick Johns and the shared experiences of fellow readers, you’re never alone in your home improvement endeavors.
And, if the task proves to be beyond your comfort zone, professional plumbers are just a call away. By staying proactive in maintenance and addressing issues promptly, you’ll enjoy a functional and aesthetically pleasing bathtub faucet for years to come.
Sources:
- https://www.wikihow.com/Change-a-Bathtub-Faucet
- https://www.quora.com/How-do-you-replace-a-tub-faucet-with-no-wall-access
- https://ajalberts.com/replace-bathtub-faucet/
- https://www.completemobilehomesupply.com/replace_shower_tub_faucet_a/256.htm
- https://www.familyhandyman.com/project/how-to-repair-a-leaking-tub-faucet/
- https://www.thisoldhouse.com/bathrooms/reviews/how-to-replace-a-bathtub-faucet
FAQ
-
Can I replace a bathtub faucet myself?
If your bathtub faucet is old or broken, you can easily replace it with a new one all by yourself. The process is the same whether you have a single handle faucet or one with multiple controls. If you want to change your faucet handles, you need to remove them along with the stems connecting to the pipes.
-
Do you have to shut off water to change bathtub faucet?
Whether your bathtub has two handles or a single handle design, it’s installed with thin stems that connect to the pipes and will also need to be removed or replaced. Before detaching any parts, shut off the water supply to the house to prevent the plumbing from spraying.
-
What are the two types of bathtub faucets?
TUB FAUCET TYPES
Freestanding: Used with tubs without pre-drilled holes (freestanding or pedestal tubs). …
Wall mount: Installed through pre-drilled holes on the bathroom wall over tub. …
Tub deck mount: Installed through pre-drilled holes in the tub rim (called the deck). …
Tub wall mount: Installed through the tub wall. -
Do bathtub faucets screw off?
Luckily, removing and replacing your old tub spout is a cheap and easy project that doesn’t require much equipment. A slip-on faucet will have a screw on the underside of it and needs to be unscrewed before you can remove it. Screw-on faucets, on the other hand, can simply be unscrewed from the wall.
Originally posted 2023-12-21 02:25:43.